
バックエンド
エンジニア
がっきー
こんにちは、がっきーです。
バックエンド
エンジニア
がっきー
最近『学園アイドルマスター』にドはまりしてます。篠澤広ちゃんが好きです。
少し前にAR.jsを触る機会がありました。
しかし精度や制約などが気になり、他にいいものがないかと探したところ8th Wallが見つかりました。
8th Wallは2026年2月にホスティングサービスを終了し、OSSとなってエンジンのバイナリが公開されています。
今回は8th Wall + Vite + Three.jsで、WebARの開発環境を作って簡単なARを実装してみます。
環境構築
①Vite環境の作成
以下コマンドを実行します。あとは流れに沿って入力していきます。
> npx
> create-vite project-name

│
◇  Select a framework:
│  Vanilla
│
◇  Select a variant:
│  TypeScript
│
◇  Install with npm and start now?
│  Yes
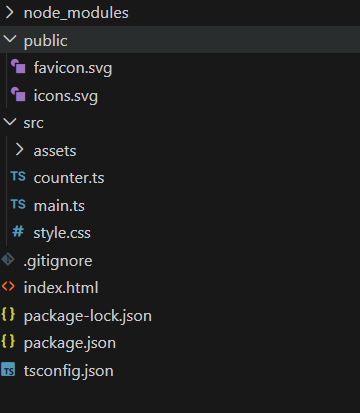
インストール時点で、こんな感じのディレクトリ構成になってます。
②必要なモジュールのインストール
$ npm install three @8thwall/engine-binary @8thwall/xrextras && \
npm install -D @types/three @types/node vite-plugin-static-copy
それぞれ、以下のような意図でインストールしています。
| パッケージ名 | 説明 |
| @8thwall/engine-binary、@8thwall/xrextras | 8th Wallのエンジン本体と、WebARアプリでよく使われる共通機能 |
| three、@types/three | Three.js本体と型 |
| @types/node | Node.jsのJavaScript用の型定義 |
| vite-plugin-static-copy | Viteのbuildで静的ファイルをコピーする |
③vite.config.tsの設定
8th Wallは、インストールしたモジュール内のjsファイルをコピーしてくる必要があります。(公式ドキュメント)
開発用とビルド用でそれぞれプラグインを定義します。
開発用は仮想パスでモジュールの中身をコピーして、ビルド用は実際にjsファイルをdist内にコピーする感じです。
import { defineConfig } from "vite";
import path from "path";
import fs from "fs";
import { fileURLToPath } from "url";

const __dirname = path.dirname(fileURLToPath(import.meta.url));

// 8thWall エンジン本体のビルド済みファイルディレクトリ
const xrDistPath = path.join(__dirname, "node_modules/@8thwall/engine-binary/dist");
// 8thWall XRExtras(追加ライブラリ)のビルド済みファイルディレクトリ
const xrExtraDistPath = path.join(__dirname, "node_modules/@8thwall/xrextras/dist");

// ファイル拡張子 → Content-Type のマッピング
// 8thWall の .wasm/.mem/.data などを正しい MIME タイプで配信するために必要
const MIME: Record<string, string> = {
  ".js": "application/javascript",
  ".wasm": "application/wasm",
  ".mem": "application/octet-stream",
  ".data": "application/octet-stream",
  ".png": "image/png",
  ".jpg": "image/jpeg",
};

export default defineConfig({
  plugins: [
    {
      // 開発サーバー用プラグイン:
      // node_modules 内の 8thWall ファイルを仮想パスで配信する
      // (8thWall はスクリプトから /xr/* や /xr-extra/* を参照するため)
      name: "serve-xr-dev",
      configureServer(server) {
        // /xr/* → node_modules/@8thwall/engine-binary/dist/* へ転送
        server.middlewares.use("/xr", (req, res, next) => {
          const filePath = path.join(xrDistPath, req.url ?? "/");
          if (fs.existsSync(filePath) && fs.statSync(filePath).isFile()) {
            const mime = MIME[path.extname(filePath)] ?? "application/octet-stream";
            res.setHeader("Content-Type", mime);
            fs.createReadStream(filePath).pipe(res);
          } else {
            next();
          }
        });
        // /xr-extra/* → node_modules/@8thwall/xrextras/dist/* へ転送
        server.middlewares.use("/xr-extra", (req, res, next) => {
          const filePath = path.join(xrExtraDistPath, req.url ?? "/");
          if (fs.existsSync(filePath) && fs.statSync(filePath).isFile()) {
            const mime = MIME[path.extname(filePath)] ?? "application/octet-stream";
            res.setHeader("Content-Type", mime);
            fs.createReadStream(filePath).pipe(res);
          } else {
            next();
          }
        });
        // /image-targets/* → src/assets/* へマッピング
        server.middlewares.use("/image-targets", (req, res, next) => {
          const filePath = path.join(__dirname, "src/assets", req.url ?? "/");
          if (fs.existsSync(filePath) && fs.statSync(filePath).isFile()) {
            const mime = MIME[path.extname(filePath)] ?? "application/octet-stream";
            res.setHeader("Content-Type", mime);
            fs.createReadStream(filePath).pipe(res);
          } else {
            next();
          }
        });
      },
    },
    {
      // ビルド専用プラグイン:
      // `vite build` 完了後に 8thWall の静的ファイルを dist/ へコピーする
      // (本番環境でも /xr/* /xr-extra/* /image-targets/* が解決できるようにする)
      name: "copy-8thwall-build",
      apply: "build",
      closeBundle() {
        const outDir = path.join(__dirname, "dist");

        // エンジン本体を dist/xr/ へコピー
        fs.cpSync(xrDistPath, path.join(outDir, "xr"), { recursive: true });
        // XRExtras を dist/xr-extra/ へコピー
        fs.cpSync(xrExtraDistPath, path.join(outDir, "xr-extra"), { recursive: true });

        // src/assets/ 内の PNG ファイルを dist/image-targets/ へコピー
        const imgSrc = path.join(__dirname, "src/assets");
        const imgDest = path.join(outDir, "image-targets");
        fs.mkdirSync(imgDest, { recursive: true });
        for (const f of fs.readdirSync(imgSrc).filter((f) => f.endsWith(".png"))) {
          fs.copyFileSync(path.join(imgSrc, f), path.join(imgDest, f));
        }
      },
    },
  ],
});
④index.htmlの設定
コピーしてきたファイルをヘッダーで読み込むようにします。
あとはスタイルの設定。画面を全画面にしたり、余白を調整する目的です。
本来はCSSファイルにまとめておくのがいいです。(スピード重視の実装のため直接書き込んでます)
<!doctype html>
<html lang="ja">
<head>
    <meta charset="UTF-8" />
    <link rel="icon" type="image/svg+xml" href="/favicon.svg" />
    <meta name="viewport" content="width=device-width, initial-scale=1.0" />
    <title>project-name</title>
    <style>
      body, html { margin: 0; padding: 0; background: #000; width: 100%; height: 100%; overflow: hidden; }
      #camerafeed { display: block; width: 100%; height: 100%; }
    </style>
    <script src="./xr/xr.js" async data-preload-chunks="slam"></script>
    <script src="./xr-extra/xrextras.js"></script>
  </head>
  <body>
    <canvas id="camerafeed"></canvas>
    <div id="app"></div>
    <script type="module" src="/src/main.ts"></script>
  </body>
</html>
これで環境構築は完了です。
ここからは簡単に画像を検知して3Dオブジェクトを表示するARを作成してみます。
実装
前準備
まず画像ターゲットとして使用する画像を用意します。今回は私の似顔絵アイコンを使います。

これを8th Wallで使えるように、データ変換します。
ターミナルで以下を実行します。
$ npx @8thwall/image-target-cli@latest

Enter the path to the image file: ./src/assets/icon.png
Select the image type:
1) flat (default)
Use default crop? [Y/n]: Y
Enter the output folder: ./src/assets
Enter a name for the image target: icon
Image target data saved to: ./src/assets/icon.json
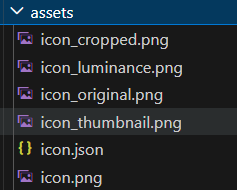
src/assets以下に必要なデータが出力されます。
実装
解説すると長くなってしまうので、実装に細かくコメントをつけてますが、ざっくり説明すると
AR検知・更新・見失った時のイベント処理をimageTargetPipelineModuleにまとめ、8thWallのaddCameraPipelineModulesに登録することでカメラパイプラインに組み込んでいます。画像を認識したら3Dの立方体を表示・追従させ、見失ったら非表示にする、という感じです。
それをイベントリスナーに登録しています。
import * as THREE from 'three'
import IconData from './assets/icon.json'
import luminanceImage from './assets/icon_luminance.png'

declare const XR8: any
declare const XRExtras: any

// XR8 内部から THREE にアクセスできるようにグローバルへ公開
;(window as any).THREE = THREE

// 画像ターゲット検出時に 3D オブジェクトを表示するパイプラインモジュール
const imageTargetPipelineModule = () => {
  let cube: THREE.Mesh

  // 検出結果の位置・回転・スケールをキューブに適用する共通処理
  const applyTransform = ({ position, rotation, scale }: any) => {
    cube.position.set(position.x, position.y, position.z)
    cube.quaternion.set(rotation.x, rotation.y, rotation.z, rotation.w)
    cube.scale.set(scale, scale, scale)
  }

  // シーンの初期化:赤いキューブを配置する
  const initXrScene = ({ scene }: { scene: THREE.Scene }) => {
    cube = new THREE.Mesh(
      new THREE.BoxGeometry(0.3, 0.3, 0.3),
      new THREE.MeshNormalMaterial() // 面の向きで色が変わるので立体感が出る
    )
    cube.visible = false // 画像が検出されるまで非表示
    scene.add(cube)
  }

  // XR セッション開始時に呼ばれる
  const onStart = ({ canvas }: { canvas: HTMLCanvasElement }) => {
    const { scene, camera } = XR8.Threejs.xrScene()
    initXrScene({ scene })

    // スクロール防止(AR 中の誤操作対策)
    canvas.addEventListener('touchmove', (event) => event.preventDefault())

    XR8.XrController.updateCameraProjectionMatrix({
      origin: camera.position,
      facing: camera.quaternion,
    })
  }

  // 画像ターゲットを検出したとき
  const onImageFound = ({ detail }: any) => {
    applyTransform(detail)
    cube.visible = true
  }

  // 画像ターゲットの位置が更新されたとき
  const onImageUpdated = ({ detail }: any) => applyTransform(detail)

  // 画像ターゲットを見失ったとき
  const onImageLost = () => { cube.visible = false }

  return {
    name: 'image-target-scene',
    onStart,
    onImageFound,
    onImageUpdated,
    onImageLost,
    listeners: [
      { event: 'reality.imagefound', process: onImageFound },
      { event: 'reality.imageupdated', process: onImageUpdated },
      { event: 'reality.imagelost', process: onImageLost },
    ],
  }
}

// XR8 を初期化してカメラを起動する
const startXR = () => {
  XR8.XrController.configure({
    imageTargetData: [{ ...IconData, imagePath: luminanceImage }],
    allowedDevices: XR8.XrConfig.device().ANY,
  })

  XR8.addCameraPipelineModules([
    XR8.GlTextureRenderer.pipelineModule(),    // カメラ映像をテクスチャとして描画
    XR8.Threejs.pipelineModule(),              // Three.js 連携
    XR8.XrController.pipelineModule(),         // 画像ターゲット追跡
    XRExtras.FullWindowCanvas.pipelineModule(), // キャンバスをウィンドウ全体に広げる
    imageTargetPipelineModule(),               // 独自の AR ロジック
  ])

  const canvas = document.getElementById('camerafeed')
  XR8.run({ canvas })
}

// XR8 スクリプトの読み込み完了後に起動
window.onload = () => {
  window.addEventListener('xrloaded', startXR)
}
動作確認
前提
スマホまたはタブレットでの接続が必要です。
PCと同じwifiに接続している場合は、こちらの記事の方法で確認が可能です。
同じwifiではない場合は、公式ドキュメントにもある通りngrokを使用するのが良いと思います。
スマホで確認
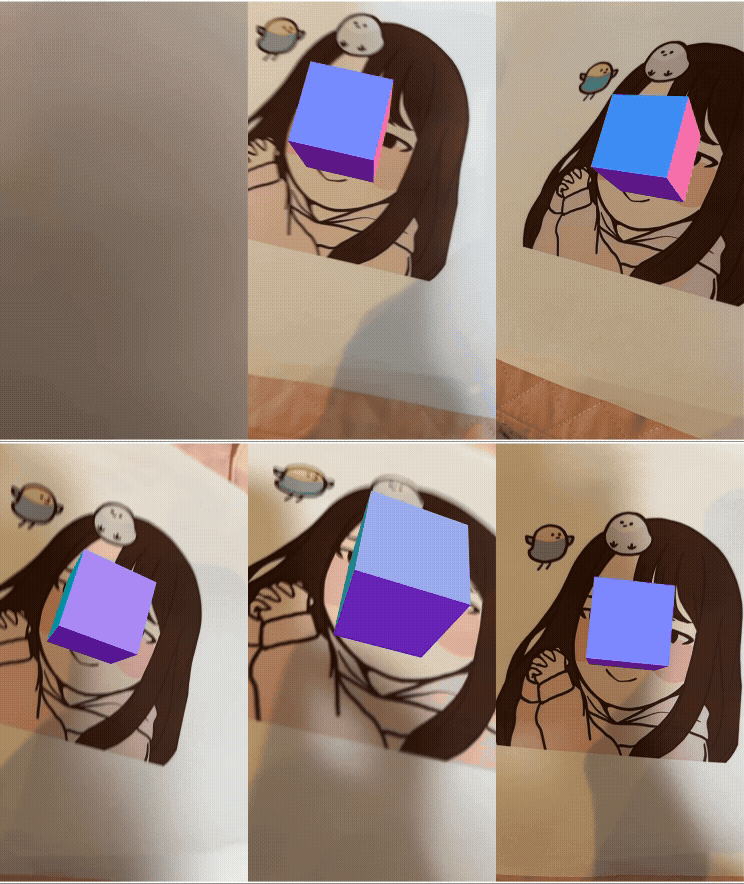
私のアイコンをカメラで写すと、立方体が表示されます。
暗めの部屋でもちゃんと認識して追従してくれます。
さいごに
8th Wallには他にも空間認識や顔認識など様々な機能があります。
目的に応じてこれらを組み合わせることで、いろんなことができそうですね。
弊社ロジカルスタジオでは、一緒に働く仲間を募集しています!
下記リンクからぜひご応募ください!